Welcome to our insanely comprehensive (6,000+ word) step-by-step guide to help website owners achieve super fast website speeds in less than a few hours of work.
This month I helped around 50 business owners reduce their website speed (which is a pretty regular month).
Why does speed matter?
There are 2 main reasons why speed is important:
- To keep your customers happy; and
- SEO (keep Google happy).
People expect your website to run fast or they’re going to leave. This is especially true for new website visitors who don’t know your brand.
Kissmetrics says 40% of people will abandon your website if it takes more than 3 seconds to load.
Marketing thought leaders like Brain Sutter have written about this effect extensively. Take a look there if you want to understand the statistics behind how long people will wait for a website to load before giving up and leaving.
What this all means is that speed is important for helping you retain visitors on your website and (hopefully) converting them into paying customers.
You’ll never even get a chance to engage with your visitors if they leave before the page loads.
On the other hand SEO is important too and there has been a lot of discussion about how Google uses your page speed in its search engine ranking algorithm. A faster page speed will improve your overall search engine rankings.
With all that in mind we wrote this insanely comprehensive step-by-step guide to help website owners achieve super fast speeds in less than a few hours of work.
Let’s take a look at what we’re going to be covering:
Contents of this guide:
- What is a good speed?
- How should you test your speed?
- Page caching
- Compression and minification
- Optimising images
- Removing HTTP requests and reducing plugin impact
- High performance hosting
- Database optimisation
- Server optimisation
- Using a CDN
- How to solve common website errors caused by speed optimisation
- Wrapping things up (technical speed vs perceived speed)
We’re also giving away a free downloadable eBook version of this guide with a bonus chapter on fast page redirects exclusive to the eBook version. Grab your free eBook copy of the guide here (edit: no longer available):
Make your website load faster (and a lot more)
1. What is a good speed?
Testing speed is probably where most people get things wrong the most. There are a lot of great tools out there to test speed but also some bad ones. People often come to us after using a speed testing tool they’ve found on the internet somewhere to tell us their website scored 25 out of 100, which they assume means is really bad when actually it doesn’t always mean that once we dig into the data.
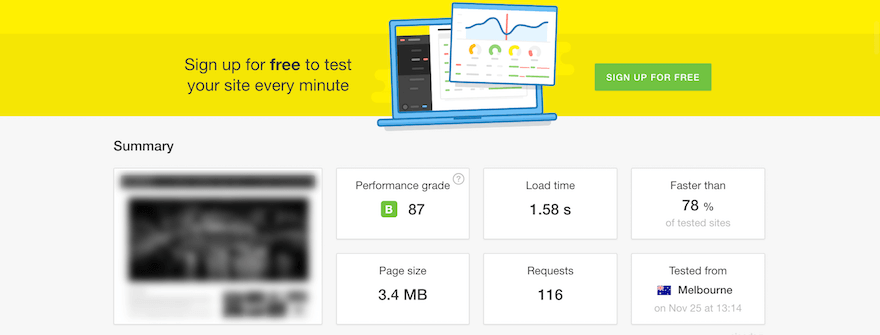
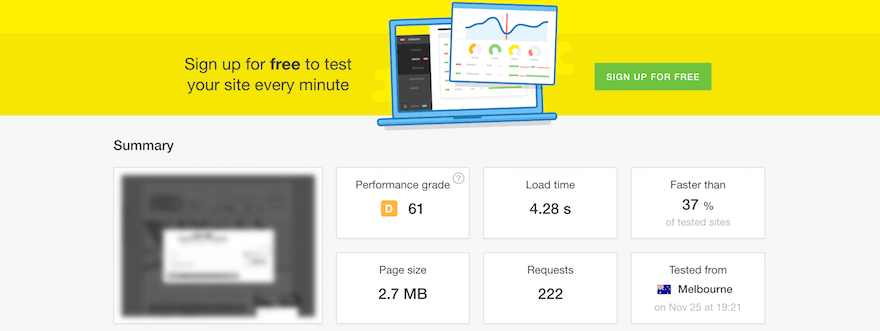
Here is a good example of a speed test we ran on a client’s website (blurred for their privacy):
You can see here their website is loading in 1.58 seconds yet the tool is claiming this is a “B” grade which is faster than only 78% of websites. These performance metrics did not take into account the website’s needs and goals as a whole.
The site above is for a photography business and the page we tested (the homepage) has 48 images on just that single page. This means that 1.58 seconds is actually extremely fast. Before the client came to us the website was loading in 9.5 seconds.
At WP Runner we prefer to look at the load time (in seconds) as the one metric that matters for speed testing. That means we do not focus on performance grades or comparison scores. Those sorts of vanity metrics are extremely misleading and often cause people to spend 10x longer on speed optimisation that they actually need to.
In our business we put websites into 1 of 4 categories:
- Slow = greater than 4 seconds load time
- Once you become slower than this speed you will really start to see people dropping off
- Acceptable = between 2-4 seconds load time
- This speed is perfectly fine for highly dynamic websites with lots of plugins that add awesome functionality to the website
- Fast = between 1-2 seconds
- This is extremely achievable for a lot of websites
- Extremely fast = less than 1 second
- It is rare to achieve this kind of score without removing huge chunks out of your website
2. How should you test your speed?
Testing your speed doesn’t require expensive or complicated tools. We use Pingdom’s free Speed Test tool as our main testing tool.
We also use Google’s PageSpeed Insights and GTmetrix. Be careful with some of these tools though. We find them to be less accurate than Pingdom and definitely way more focused on vanity metrics.
For example, the client site above that is loading in 1.58 seconds received a score of 25 out of 100 on Google PageSpeed Insights and an F grade on GTmetrix. though we already know those scores are wrong, this website is very fast.
We encourage people to test speed using as many tools as they want since all testing tools have a chance to provide some new insights. However we suggest using Pingdom as your main testing tool and we’ll be using it for the rest of this article.
3. Page caching
Caching is (in our experience) the number 1 way to speed up a WordPress website. If a website is loading in 10 seconds typically a good caching solution will improve that load time by 50% or more.
WordPress has some awesome caching plugins that you can install in one click from the plugins area of your website.
The two main caching plugins that we recommend are W3 Total Cache (free) and WP Rocket (paid). WP Rocket is a better caching plugin by a very small margin. You really can’t go wrong with either of those plugins though.
For this article we’re going to focus on W3 Total Cache since its awesome and free to use.
What if I already have a caching plugin installed?
If you already have a cache plugin installed then I suggest you run a speed test on your website first, then deactivate your current cache plugin and install W3 Total Cache.
Follow along with our configuration here and then test the speed again at the end. If your old plugin is better then you should keep it. But we find that is rarely the case once you’ve configured W3 Total Cache correctly.
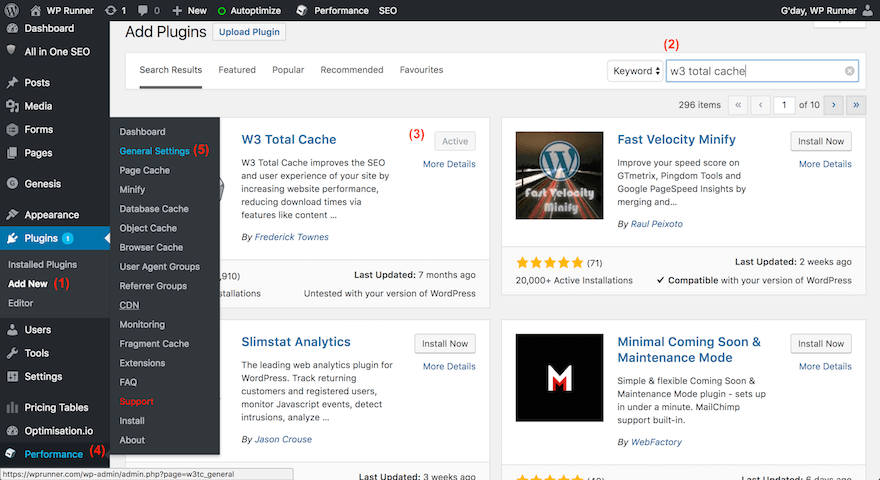
Here is a quick setup guide for W3 Total Cache in one image:
What you need to do here log into your WordPress website and then (1) click add new plugin (2) type in “W3 Total Cache” (3) install and activate W3 Total Cache (4) hover over the new “Performance” sidebar menu item; and (5) click on “General Settings”
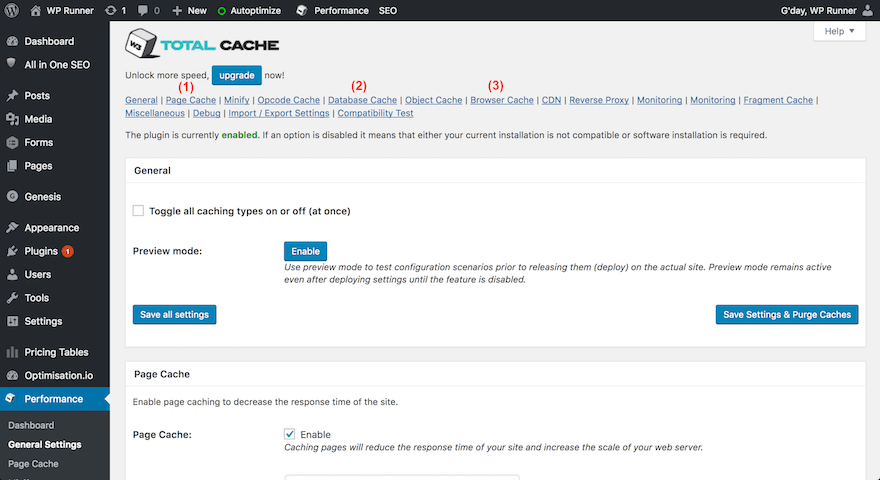
Then after you’ve done that you need to activate 3 types of caching from the general setting page:
90% of websites only need to activate (1) “Page Cache” using the “Disk: Enhanced” method (2) “Database Cache” using the “Disk” method; and (3) “Browser Cache”. You can reach all 3 of these areas by clicking the 3 links marked in the image above. Activate all of these and then hit save.
If your website is using the WooCommerce plugin you’ll be prompted and guided through adding an exception to the database cache settings page to stop your shopping cart from having issues with the cache. We wont cover this in detail because W3 Total Cache does a good job at guiding people through that process.
Each of the 3 types of caching we just activated have their own settings pages with a lot extra detail and configuration options. We will often spend a lot of time here tweaking everything until it’s perfect for our clients.
However for this guide we think you will be fine with the default settings. We typically don’t advise people to go in and change any advanced settings unless they really know what they are doing.
One exception to that advice is the browser cache settings page. We do suggest you go into there and tweak a few settings. We’ve highlighted here our recommended configuration:
Enable all those settings above in the general browser cache settings including:
- Set last-modified header
- Set expires header
- Set cache control header
- Set entity tag (ETag)
- Set W3 Total Cache header
- Enable HTTP (gzip) compression
- Remove query strings from static resources
Do all of those and you should be good to go with caching!
Don’t forget too, if you want to get a copy of this guide as an eBook you can grab a free copy here:
Make your website load faster (and a lot more)
I saw they have a minify setting. That looks awesome! Should I enable it?
A lot of people make the mistake of enabling W3 Total Cache to “minify” their website. Minification is broadly the process of making your website’s pages smaller and combining code together to make it more efficient and faster to load.
We do not recommend doing this using W3 Total Cache because we’ve personally had a lot of issues with W3 Total Cache’s minify functionality breaking websites. We prefer an alternative solution described below in the next section of this guide called “Compression and minification”.
4. Compression and minification
As described above, compression is the process of making your website’s pages smaller and combining code together to make it more efficient and faster to load.
The tool we use and recommend to our customers is Autoptimize (free).
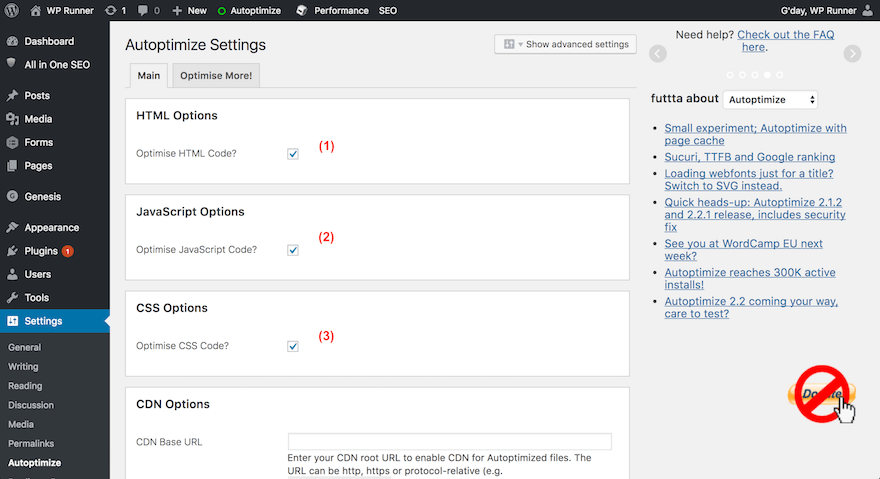
There’s nothing too complicated about this, all you need to do is install this plugin and open up the settings page, click to enable the following settings:
We’ve disabled the advanced settings here, but most people won’t need them, just make sure to enable (1) optimise HTML code (2) optimise JavaScript code; and (3) optimise CSS code.
Once you’ve done those go back and check your website. If things are looking messed up you might need to disable the optimise JavaScript option since that can cause problems with JavaScript heavy themes and plugins in rare cases.
5. Optimising images
Images are a big part of modern websites but are often a huge reason why websites load so slowly. For example on this page alone we have around 15 images. Without optimisation our images here would have equalled around 15-20 megabytes of space (which is a lot).
By optimising our images we’ve gotten the size of our images down to 0.5 megabytes for all 15 images which is more than 30 times smaller than our original combined image sizes!
In this section we are going to look at how to track down big images that are loading slowly and a few ways to reduce their size and impact on load times but still keep our website looking great.
First off, you’ll need a way to identify problem images. We strongly suggest using Google’s PageSpeed Insights tool for this.
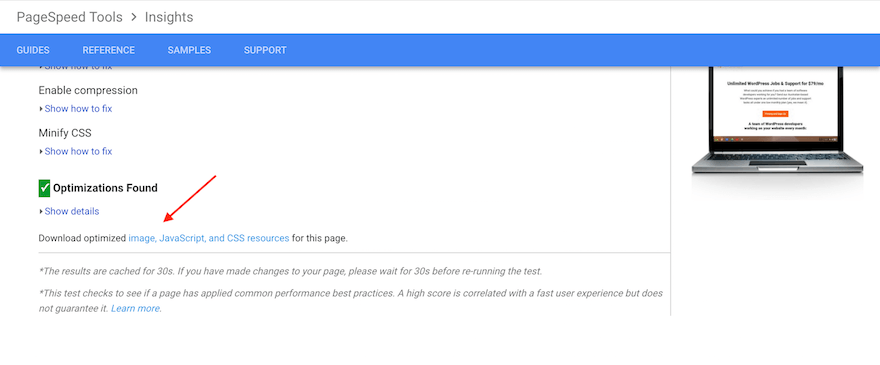
The PageSpeed Insights tool will scan your web page and grab copies of all the images on the page that it thinks are not optimised well. The tool will then resize and compress these images and make them available for you to download.
Once you run a scan using the PageSpeed Insights tool you just need to scroll down to where it says “download optimised images, CSS and JavaScript resources” and click the download link:
Once you’ve downloaded these optimised compressed images you’ll need to manually upload them back into WordPress and replace your old images with the new ones. This might mean you have to edit the page or update the images inside, for example, a slider plugin but is well worth the effort.
A word of warning about these Google generated images – they are “lossy” and not “lossless”. This means that the quality of these images may not look as good as the original. In fact sometimes we’ve found these images end up looking terrible compared to the original file so we end up not being able to use them on the site.
If can’t use the images because of poor quality then we typically end up using the Google generated images as a guide and then do our own manual compression using a “lossless” compression tool like TinyPNG, which we describe in more detail below.
How do I manually reduce the size of images if I can’t use Google’s PageSpeed Insights tool?
If you can’t use Google’s tool then there are a few really good ways to compress images that we recommend and use with our clients:
- Install an image optimisation plugin such as WP Smush (free with limited functionality) this can sometimes break images on your site so we always suggest backing up your website before you use it.
- Right-click on images and save them to your computer and then resize them on your computer and run them through a tool such as TinyPNG to compress the images manually. As mentioned before TinyPNG is awesome because it uses a lossless compression method which means you won’t see a loss of image quality.
- If you use a tool like TinyPNG then you’ll need to re-upload those images and manually swap them around with the old ones (by editing your pages).
- Advanced method: if you understand HTML and can inspect the code of the page and work out how wide (in pixels) your page needs to be you can download and resize your images to fit the maximum width of your page. For example on this page we know that the maximum width of our blog post is 880px. Resizing our images to 880px reduced our image sizes by 60% without doing anything extra.
What about lazy loading?
Another thing that many people to do decrease page load times is to use an image “lazy load” plugin. These plugins load your images after the rest of your page has loaded. They can even load images only when you’re about to scroll to the part of the page that needs that image. Pretty neat and great for saving bandwidth.
Even though these lazy loading plugins are awesome they can cause page errors or images to fail to load from time to time so you’d want to test any lazy loading plugin pretty thoroughly before committing to it.
Two lazy loading plugins that we use and recommend are BJ Lazy Load and a3 Lazy Load (both free). These plugins are very easy to set up and once activated you can just let them do their thing in the background without much ongoing management.
6. Removing HTTP requests and reducing plugin impact
The next thing we need to look at is the number of requests on each web page. A request is when your website asks for something from the server. It could be requesting an image or a script or another bit of data. Every request takes time. Even if that time is in milliseconds, it all adds up to slow down your website.
The good thing for us is that if we can reduce the number of requests we can increase the speed of the site.
If you remember the speed test we did for one of our clients at the very start of this guide you’ll notice we returned a result of 116 “Requests”. Here it is again:
Now 116 isn’t great but it’s also not that bad for a WordPress website. Typically we should aim for less than 80 requests but that’s not always practical, especially because in this case our client’s website is a photography business and has 48 images on this page. The images are what push us above 80 requests.
If we look at another website from a different client (pre-optimisation) you can see the impact that a higher number of slow requests makes:
Even though this second website is smaller and has a lot less images on the page it is loading a lot slower because of the number of requests which are blocking the page load.
So how can we do our bit to reduce the number of requests on our WordPress site?
There are two things we can do:
- Remove unnecessary plugins or find better solutions; and
- Install and configure the WP Disable plugin (free) to remove unnecessary requests
First let’s look at removing unnecessary plugins.
One of the best ways to kill the speed of a website is to install 50 different plugins onto your site. These plugins all add their own scripts and requests and whatever else.
Unfortunately WordPress makes it really easy to end up like that. A lot of people’s behaviour is to add new plugins to their site every time they want to do something new or solve a difficult problem.
This approach can quickly double or triple your website’s load time particularly because a lot of WordPress plugins are badly coded without any thought about website performance.
If you don’t know which plugins are coded badly then you can’t really do much to avoid the problem.
At WP Runner we often help clients review and replace badly coded plugins with better ones or even write our own code to do what people want in a much faster and more stable way. Our goal is normally to help people get down to less than 20 active plugins.
Once you do a plugin review you can make a solid plan to replace old or badly coded plugins with better solutions.
Here is a good list of the types of plugins that we see causing the most performance and speed problems on people’s websites:
- Social sharing / social feed type plugins
- A faster and generally better social sharing plugin is the Easy Social Share plugin, in fact it’s the exact plugin we use on this blog.
- Analytics / tracking plugins
- These plugins can make it easy to add tracking or analytics scripts to a website, but they can really slow things down too. We often help customers add Google tracking code the right way, which saves them load time. Some of these analytics providers will provide a guide on how to do this.
- Geolocation / multi currency plugins
- Removing a geolocation plugin once reduced a customer’s load time by a full 3 seconds. Enough said.
- Slider / gallery / image plugins
- These plugins help make a website look awesome, but there are a lot of badly coded slider plugins out there. WP Rocket create a slider performance comparison blog post which is well worth a look.
- Popup / email marketing / subscription plugins
- Popups can add a lot to the load time since they are normally very code heavy. Plugins like Optin Monster are not too bad these days and honestly the benefit of these plugins is often greater than the performance cost of using them.
Removing and optimising plugins is always going to be a balancing act. Your website is there to help you win more customers so you need to weigh up the cost of removing plugins. Typically we find the better option is to replace poor performing plugins with better solutions after a careful plugin review.
Now let’s turn our mind to factor B – reducing the number requests using WP Disable.
WP Disable is an awesome plugin that we use regularly to reduce on average around 10 requests from a website. This might not seem like a lot, but is often around 10% of requests, which definitely does help.
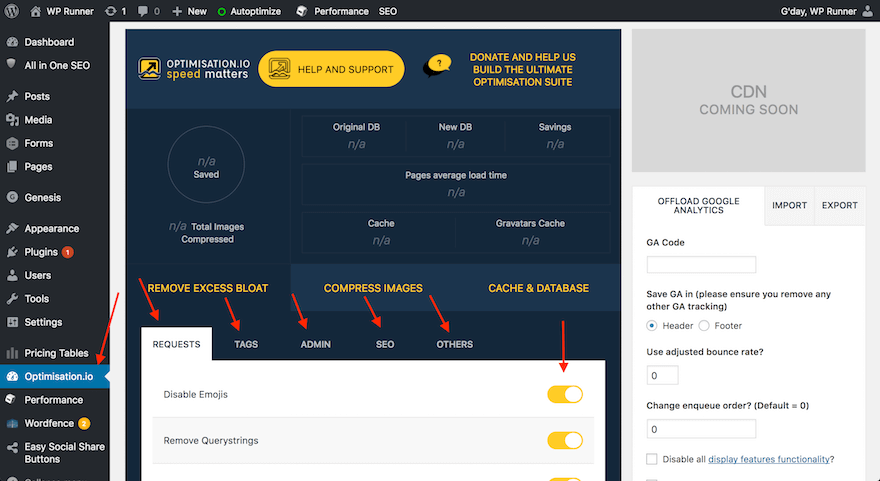
First, you can start off by installing WP Disable, which adds a menu item inside your WordPress admin area called “Optimisation.io” if you click that you’ll head into the settings where you can switch on disabling requests for a bunch of things in a different categories:
As a base rule we suggest that you turn on disabling everything except for the following things:
Don’t:
- Disable Autosave
- Disable admin notices
- Disable pingbacks and trackbacks
Only disable these if you are not using these features or know what you are doing:
- Disable Google Maps
- Disable author pages
- Disable all comments
- Remove jQuery migrate (note: this can cause issues if plugins need this script)
- DNS prefetch
- Remove duplicate names in breadcrumbs WP SEO by Yoast
That is a pretty typical setup for us. If you’re not sure about switching something off or it look important then it’s best to leave it turned off or ask us and we’ll see if we can help.
7. High performance hosting
Website hosting can make a big difference to page load speed. Particularly if your hosting company is not doing a quality job.
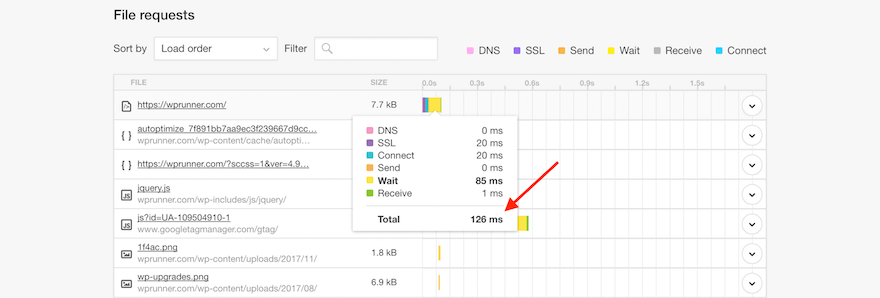
For example, at WP Runner we’re hosted with a reliable local company that uses high quality infrastructure. It costs us only slightly more money. If you look at our Pingdom speed test, near the bottom of the test we have our “waterfall” which shows how the page load plays out from start to finish:
The first line on that waterfall is the time it takes for our server to return a response, which is a total of 126ms – just 12% of 1 second. That is quite fast!
Compare this with one of our client’s websites (before we moved them to a better server):
Their server was responding in 1.22 seconds (yes, seconds not milliseconds!). This is almost 10 times slower than our WP Runner server. Moving our client to a different server saved them almost a full second of load time, which made a huge difference to their overall speed.
Great so how do I find a good performing hosting company?
If you think you need to change hosting company what sorts of things should you look for in a new website hosting company?
At WP Runner we typically look for the following things:
- Rock solid reviews
- SSD storage
- PHP 7+ (we’ll get into this in more detail later)
- VPS hosting (optional)
VPS hosting is a slightly more expensive type of hosting (only around $10-$15 per month more expensive) which will give you much better performance than regular shared hosting.
Using regular shared hosting means dozens and often hundreds of people are sharing the same server as you. That means if someone else is operating a very popular website on the same server it can really impact the performance of your website and this will be totally outside of your control.
On the other hand a VPS server guarantees you’ll get a certain amount of resources allocated directly to you. That can be awesome since it means you can achieve much more consistent performance and typically better website speed overall. Where possible we suggest getting VPS hosting.
We aren’t a hosting company and we don’t really prefer or recommend one company over another since website hosting companies can often be really great for a few years and then when their hardware becomes outdated they can take a turn for the worst.
Luckily WordPress is very easy to move to a new server and it is something we do with zero downtime for our clients fairly regularly. Many hosts even offer this service for free or a small fee so we suggest checking that out too.
If your website uses WooCommerce or another ecommerce platform then it is strongly recommended you use VPS hosting because ecommerce uses a lot more server resources than other types of WordPress websites.
If you think your current website hosting is not very good then you should review other hosting options, ask other business owners and then make the best decision you can with the information you have available.
A word of warning here too: sometimes there is really no good way to know if you are choosing a good or bad website host. Switching providers is always a risk and there’s no guarantee they will actually be better than your last hosting company.
Our clients find as long as they make sure they take the time to look at reviews they will typically find they have made a good decision.
When in doubt you can always ask for our help.
8. Database optimisation
We won’t spend a lot of time on database optimisation since it’s not something you’ll need to do in detail unless you really know what you’re doing.
Our team has been working with WordPress databases for years so we feel comfortable when optimise databases. But if you don’t have that experience you can do a lot of damage to your site.
For most people we suggest using the WP Sweep plugin (free) which is more limited but a lot safer than digging directly into the database. We still strongly suggest backing up your website before making any changes to the database, even when using WP Sweep because cleaning up a database cannot be undone without a backup.
Once you install WP Sweep you’ll end up seeing a dashboard like this:
This is our website’s database, which was cleaned only about 2 weeks ago. Yet still we have 95 revisions, 62 transient options and a bunch of other stuff.
We’ve seen client websites with over 20,000 bits of unnecessary data clogging up their database, causing the database to become a serious bottleneck for performance of their website. Overall we suggest cleaning up your database at least 3-4 times per year.
We suggest sweeping up everything except for “Unused Terms”. The reason being is that unused terms can do things you didn’t expect to happen such as removing blog categories or posts that you didn’t intend to remove.
9. Server Optimisation
Server optimisation can get extremely technical too. The good news is that 90% of websites don’t need to go deep into server optimisation. Also most hosting companies wont allow you to go too deep anyway.
In this section we’re just going to show you how to check that the version of the PHP code that is running on your server is the best version you can run and upgrade it if it isn’t.
The latest version of PHP (at the time of this article) is PHP 7, however most shared servers run PHP version 5 by default for compatibility reasons.
Upgrading your server to PHP 7 is very easy and the latest version of PHP runs a lot more efficiently than the old version 5 so it can end up boosting your website speed in our experience by up to half a second.
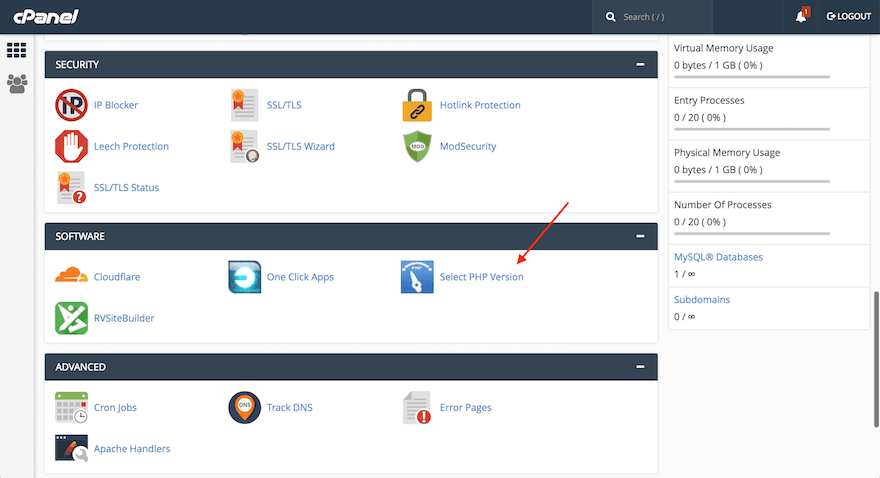
To upgrade your version of PHP you’ll need to log into your server. In this guide we’re assuming you use cPanel to manage your server, which is what 95% of our clients use. So please grab your cPanel login details and login to your server (these details are usually emailed to you when you first setup your website).
Once you’re inside you’ll see your cPanel dashboard. Scroll down until you find where it says “Select PHP Version” under a section called “Software”. For example, my cPanel dashboard looks like this:
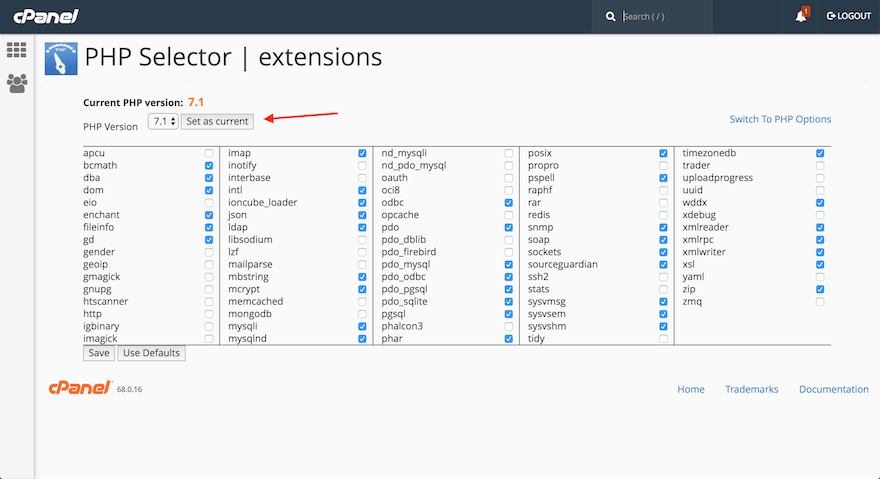
Click the “Select PHP Version” link and you’ll enter a page that allows you to change the version of PHP you have. Select 7.1 from the dropdown and click “Set as Current” (though read the note below this image first before you do):
There are three things you’ll need to consider here before you set the new version of PHP.
First, if you can’t find what i’ve showed you here then you might be using an old version of cPanel or a customised version. In that case it’s probably easier to just contact your hosting company and ask them to change it for you, which they should do for you for free.
Second, make sure you take a screenshot of the screen before you change anything. This is so you can set it back to what it was before (including setting back all of those checkboxes in the bottom half of the screen) in case you have any issues.
Finally, setting your PHP version to 7.1 might cause your website to crash or have a blank screen. If this is the case then you likely have a plugin or theme installed that is not compatible with the latest version of PHP.
If that is the case then you should try setting PHP to version 7.0 first and checking the website again. If PHP 7.0 also causes errors then you’ll need to set it back to PHP version 5.6 or whatever it was before.
There is also an awesome plugin called PHP Compatibility Checker (free) that you can use to check your website for plugins that might not be compatible with the latest version of PHP. This may help you identify what is causing the error if you experience issues upgrading PHP.
10. Using a CDN
A CDN or Content Delivery Network is a network of servers all over the world that deliver a cached version of images and other static assets from your website directly to your visitors from a CDN server that is geographically closer to them.
A CDN solves the problem of distance since a website visitor might be on the other side of the world they will naturally have to wait longer for your website to load because the data from your server has to travel halfway around the world to reach them. This can make your website up 10 or 15 seconds slower for people who are far away from you.
What a CDN does is deliver a copy of parts of our website to website visitors from somewhere much closer to where that person lives.
For example our server is hosted in Sydney, Australia. However when someone visits our website from London they still feel like our website is fast because we use a CDN to deliver parts of our website from a server that is in Europe, which is naturally much closer to that person.
Setting up a CDN used to be a pretty complicated and expensive thing. You had to tell the CDN what to cache and where to store the cache and if you told it to cache things in more than 2 or 3 places then it would cost a fortune.
Enter Cloudflare.
Cloudflare is a free CDN, caching and security service and much more (but right now we’re focused on their CDN only). Their free CDN service can serve your content from one of more than 100 data centers around the world.
Before Cloudflare most businesses would have had to pay thousands of dollars per month for service of this size. What I’m saying is that this is a big deal.
Today we’re going to share how we use Cloudflare and the steps that you can take to get it set up on your site.
Step 1: create a free Cloudflare account
When you create a Cloudflare account you’ll be asked to enter your website URL and when you do Cloudflare will scan your website and pick up your domain settings automatically.
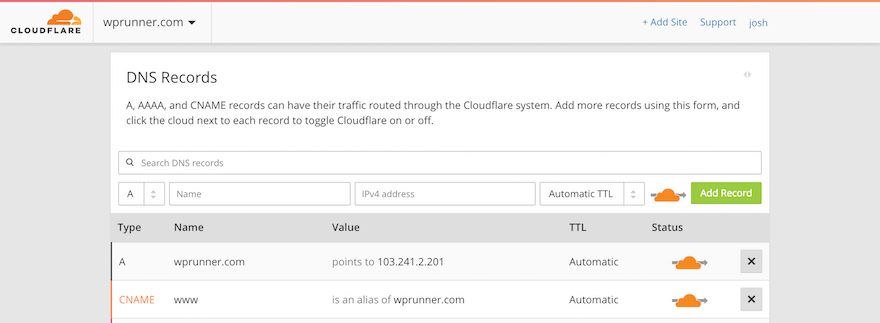
This scan is not always perfect so when you get to the step where it shows you the results of your DNS scan please check these over and take a screenshot of them to compare with your old DNS settings (which we’ll come to later). As an example, our DNS page looks like this (some items missing for privacy reasons):
Note: when you finish setting up Cloudflare you will be presented with 2 nameserver addresses to change your original nameservers to Cloudflare’s nameservers. This will effectively start routing your traffic through Cloudflare before it hits your server so you can take advantage of all their awesome features including the CDN. These name servers are different for almost everyone, but they should look something like this:
These nameservers will always follow a ###.ns.cloudflare.com format.
Step 2: login to where you purchased your domain name and change the nameservers
Once you’ve noted those two namesever addresses down you’ll need to log into wherever you purchased your domain name and hunt around in the settings for a place to update your nameservers. Delete whatever nameservers were in there before (but take a screenshot just in case you have to switch back). Update those and hit save.
It can take up to 24 hours for the nameservers to switch over completely, but we typically find it takes a lot less than that.
You can check if everything worked from inside Cloudflare by pushing the “Recheck Nameservers” button like in the screenshot above. Once everything is green on the Cloudflare side you’re finally set up and ready to roll with an awesome CDN.
Cloudflare is pretty much a zero management platform, meaning after you’ve set it all up you can forget about it and move on with other things and Cloudflare will do a good job of being a CDN all on its own.
What if I can’t or don’t want to use Cloudflare as my CDN?
While we use and recommend Cloudflare (we have almost 100 customers using it across all our businesses). We also know it’s not for everyone and there are likely legitimate reasons why you wouldn’t want to use it.
Alternative CDN solutions include MaxCDN and Amazon Cloudfront which can be set up and run using W3 Total Cache or many other caching plugins. You can find a more detailed guide for setting up MaxCDN with W3 Total Cache here.
11. How to solve common website errors caused by speed optimisation
In this section we’re going to talk about what to do if your efforts in speeding up your website cause errors or problems with your site.
It can be unfortunate but sometimes setting up this level of speed optimisation can cause problems with your website such as:
- Broken page styling
- Broken widgets, sliders or other website functions
- Pages won’t update even when you edit the page content
- Other website errors
Running through the solutions detailed below will normally fix 80-90% of these issues. So if you’re experiencing problems I suggest you try the following:
- Cache errors and conflicts can be fairly common. So the first step would be to clear all of your caches. If you followed everything in this guide then you’ll need to clear four caches in total: (1) W3 Total Cache (2) Autoptimize Cache, (3) Cloudflare’s Cache; and (4) your web browser’s cached images and files. All of these caches can be cleared/flushed from their respective settings pages.
- If that doesn’t help then you should move on to experimenting with turning off Autoptimize JavaScript, CSS and HTML compression. You may not need to turn all three off, just try turning JavaScript compression off first and then dig into the advanced settings which offers some suggestions on how to increase compatibility.
- If that doesn’t work then try looking into the WP Disable settings page. One thing to try is to stop disabling jQuery Migrate since some plugins may need this.
- Next stop would be to try disabling your lazy loading images plugin since these plugins can cause issues or conflicts with themes in particular.
- If nothing there has worked so far then you should try logging into your server/cPanel and changing your PHP version back down to 5.6 or 5.4 to see if that helps. You can typically contact your hosting company for help with this if you’re not comfortable doing that.
- The next thing to try would be to disable your CDN. In Cloudflare you can do this on the DNS setting page but clicking the yellow/orange cloud beside your main “A” record. This will disable Cloudflare for that DNS record which should also turn off Cloudflare’s CDN.
- If that doesn’t work then you should head into your caching plugin and try switching off different types of caching, for example you can turn off browser and database caching and just leave page caching on.
- If none of this works then it’s time to disable your caching plugin all together and swap it out for another one such as WP Super Cache.
- If you still have problems after all of that then you need to do one of two things: (a) turn everything in this guide off and switch it on again one by one until you find what is causing problems, or (b) restore your website from a backup and contact a WordPress expert who can help you.
12. Wrapping things up
If you follow all of the steps here and set everything up correctly then you should have all the speed improvements and advancements that 90% of WordPress websites need. Typically we find even highly dynamic or image rich websites will come down to under 3 seconds load time after taking all of the above steps.
HTTP redirects
The only extra thing you could do is sort out your redirects which can be a pretty detailed process but also provide a fair bit of speed improvement. HTTP redirects is something i’ve covered in detail as a bonus chapter in the free eBook version of this guide:
Make your website load faster (and a lot more)
Test speed vs perceived speed
One thing you have to be careful about is test speed vs perceived speed. In an ideal world you would be scoring 10/10 on any speed testing tool. But you have to understand that those tools rarely if ever give a perfect score. They will always suggest there is more to do, often because they want to sell you another premium “performance tool” they have available for you.
Doing most of the things in this guide is everything that 90% of websites will ever need to do. After you’ve done the things in this guide I want you to log out and then load up your website. Since you’re logged out you are now seeing exactly what your website visitors are going to see when they visit you.
I want you to load up the page several times and feel how fast it is. If you feel like its loading very fast then this is all that matters. Because at the end of the day test speeds don’t matter. All that matters is the perceived speed that your website visitors experience. So if you’re happy with that then I would say put this to rest and continue being a rockstar business owner.
Thank you for everyone who read this guide and helped shape it in into what it is. Please also post any questions or comments you have in the comments section below.
And of course, if you want expert WordPress help, including speed optimisation, done on your website then we’d love to help you out.
Feature image credit: Johannes Andersson on Unsplash

